

As part of Blakes branding, all employees are asked to create a new email signature to comply with Firm standards. Please read the instructions carefully before you begin. This process will take approximately 10 to 15 minutes to complete. Complete this update using Microsoft Edge or Chrome browser (do not use Internet Explorer). If you have an existing email signature and would like to refer to its contents, start a new email in Outlook now.
We have developed two short video tutorials on how to complete the form and update your Outlook signature. We have also developed a 3rd video tutorial for those of you who also need to update the signature on your Blakes mobile device. To skip to a specific section in the instructions click on the links below:
Our Firm standard for email signature is Arial font and size 10, name in bold and email link in Blakes red. It should consist of the following lines:
FirstName LastName Credentials (optional Pronouns e.g. she, her, hers) |
If you have a Firm-managed mobile device, you will need to create this email signature both in Outlook and on your mobile. To start, click here to access the Email Signature Generator. This tool will generate your signature with the correct formatting and layout.
- All fields on the form indicated with an asterisk are required fields. Begin by selecting the language for your signature. If bilingual is chosen, you will have different options in the Pronouns dropdown later.

Enter your full name, with first and last name separated by a space.

You have the option to include Credentials or Designations after your name. For practising lawyers, please refrain from including LL.B. or J.D. You may include credentials outside of a law degree that are of interest to your clients, e.g., FCIArb. If you have more than one credential to include, please use a comma to separate the two.

Pronouns are optional. Use the dropdown to select your preferred pronouns or choose Custom and enter your pronouns separated by comma. If you do not select any pronouns, nothing will appear next to your name.

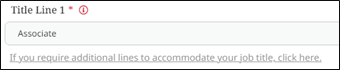
Enter your job title in Title Line 1.
Lawyers should enter the title that is currently in use in your email signature, e.g., Student-at-Law, Associate, Partner or Counsel. Please ensure your signature is compliant with the Firm’s business card rules for approved titles.
Legal assistants may include the names of the lawyers they support.
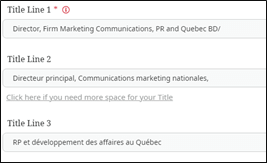
There is a 75-character limit per line. If you have a longer job title, you can either continue typing in Line 1 and a second and third line will automatically appear as soon as you go over 75 characters. Alternatively, click on the link below Title Line 1 to create a Line 2.
For bilingual titles, please append a forward slash at the end of your English title in Line 1. Then click on the link to create Line 2 and enter your French title in Line 2.
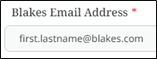
6. Enter your full Blakes Email Address.
7. For the phone number, include the country code before the number and you only need to enter the digits. Do not include dashes or brackets, it will automatically format the phone number for you. Your Blakes direct phone number should be the first phone number that appears.

For North American phone numbers, start with 1 before the area code.
For UK phone numbers, start with 44 before the area code.
You may wish to include your cell phone or another office phone number below. Select the type of phone number in the dropdown, and then enter the digits beginning with 1 for North American numbers.
8. Lastly, if you are practicing in British Columbia and need to identify as a law corporation, select Yes and it will include the standard denotation for you (An asterisk will be appended to the end of your name and * denotes law corporation will be added at the end of the signature).

9. Once everything has been filled in, click on Generate Signature Preview button at the bottom to preview what your signature will look like. If you wish to correct any information in the email signature, scroll back up and edit the fields above. Click on Generate Signature Preview to preview again.

10. When you are happy with the email signature, click on the button below the preview to Copy and send to email. Your signature will be copied and will be emailed to you as well. Do not copy the preview.

Outlook Email Signature
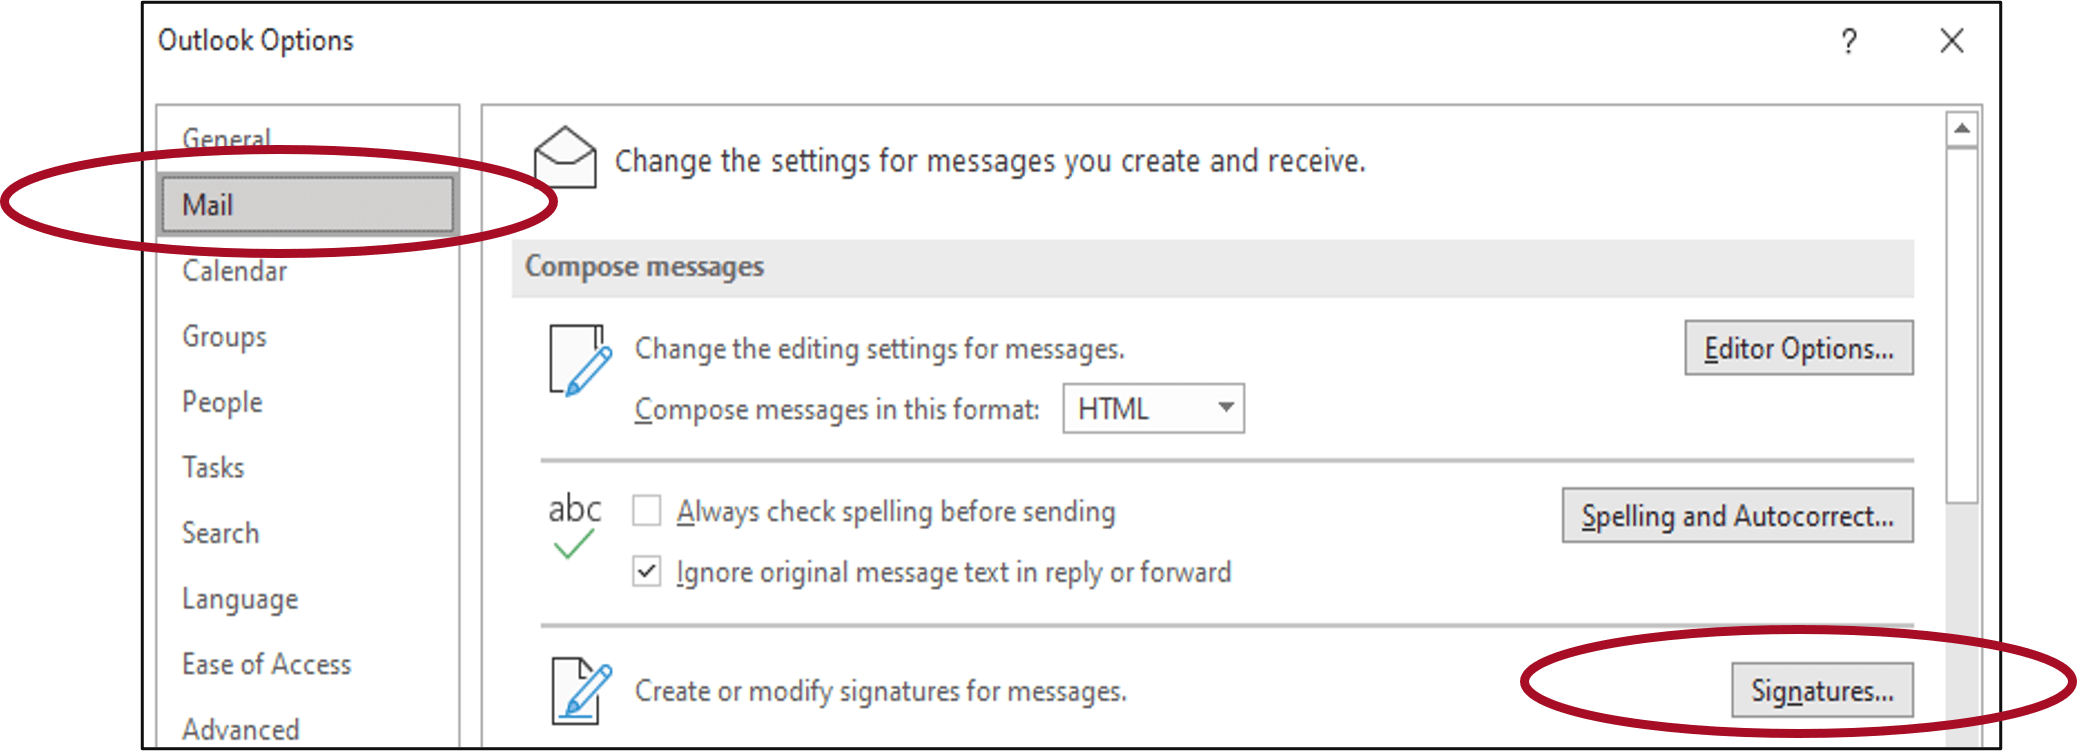
Setup your email signature on your Firm computer by going to Outlook and click on the File tab. Then choose Options towards the bottom left.
Select Mail on the left and then click on Signatures button on the right.
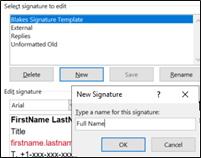
Click New to create a new email signature, even if you may have an existing one already. Enter a name for this new email signature, e.g., your name or LAS. Click OK to save.
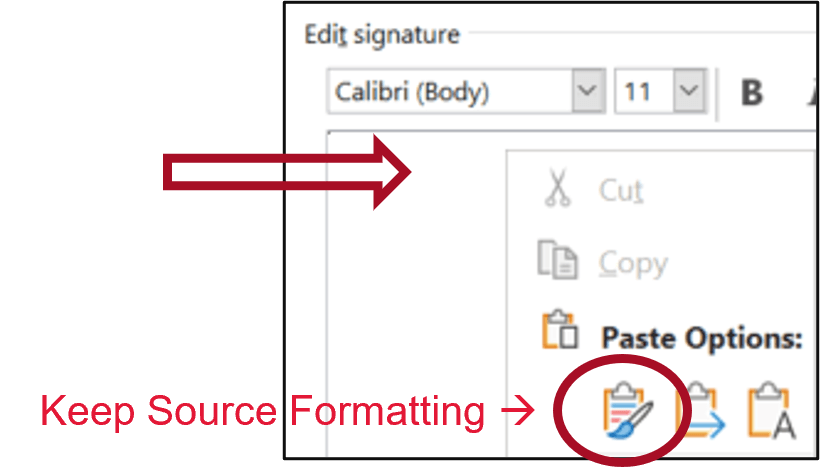
Put your cursor into the body of the new email signature (see below screenshot) and paste. You can either use Ctrl+V on your keyboard, or right-click and choose Keep Source Formatting under Paste Options. After pasting the signature, click Save.
Note: If the phone number(s) and email address are underlined in your signature, you will need to manually remove the underline. To remove the underline, highlight the phone number and click on the underline button for each phone number. Repeat to remove the underline from the email address.
Ensure this new signature is selected in the New messages and Replies/Forwards dropdown on the top right.

- Click Ok on the screen to save your new email signature. Click Ok again on the screen to exit and return to Outlook. Start a new email to verify your new email signature.
- Send an email from your computer to [email protected]. A member of the Marketing department will verify if your signature has been updated correctly.
If you do not have a Firm-managed mobile device, there is no further action required and you can ignore the email signature update sent to you. If you do have a Firm-managed mobile device, please see section below on how to update the signature on mobile.
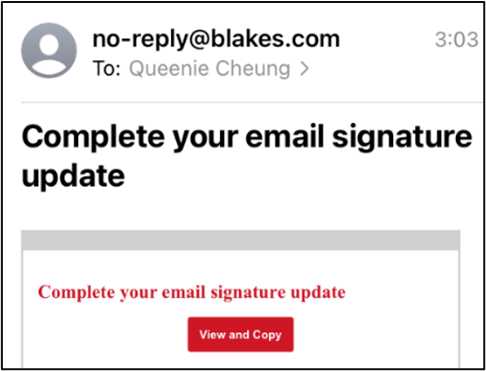
If you were unable to update your Outlook email signature immediately after filling out the form, you can refer to the email sent to you with subject line Complete your email signature update. Open the email and click on the View and Copy button.

It will open a web page containing your email signature preview. Click on the Copy button below the preview. Then follow the steps above to create your Outlook signature.
Firm Managed Mobile Device
If you have a Firm-managed mobile device, you will need to setup your email signature on the mobile as well. Follow the steps below on how to setup your email signature on the iPhone. For Android users, please contact your local HelpDesk for instructions.
- On your mobile, go to your Blakes email and look for the email sent to you with subject line Complete your email signature update. Open the email and click on the View and Copybutton.
- It will open a web page containing your email signature preview. Verify the signature is accurate and then click on the Copy button below the preview.

- Go to the Settings app icon on your mobile. Scroll down to select the Mail app and then scroll down to select Signature.

- If you have an existing signature, delete all text in the signature (you will need to backspace on all lines of text). Then press and hold in the signature field to Paste the copied signature. Once pasted, your signature will not be formatted properly (sample screenshot below).

5. You must undo this formatting. To do so, either:
- Double tap your screen with three fingers for the formatting options to appear up top. Then select the undo arrow. This will revert the email address and phone number(s) format back to the Blakes format.